
Yellowing Orchid Leaves: Causes and Treatments
Posted by Adam Kostanecki on Apr 7th 2022
Every orchid hobbyist is bound to ask the question, "Why are my orchid leaves turning yellow?", at one point or another. This condition is most often caused by the plant’s lack of water, nutrients, or both. As a result, the orchid sources these nutrients from its leaves, which causes leaf yellowing. To better understand where these issues could be stemming from, let’s review the most common culprits behind yellowing orchid leaves.
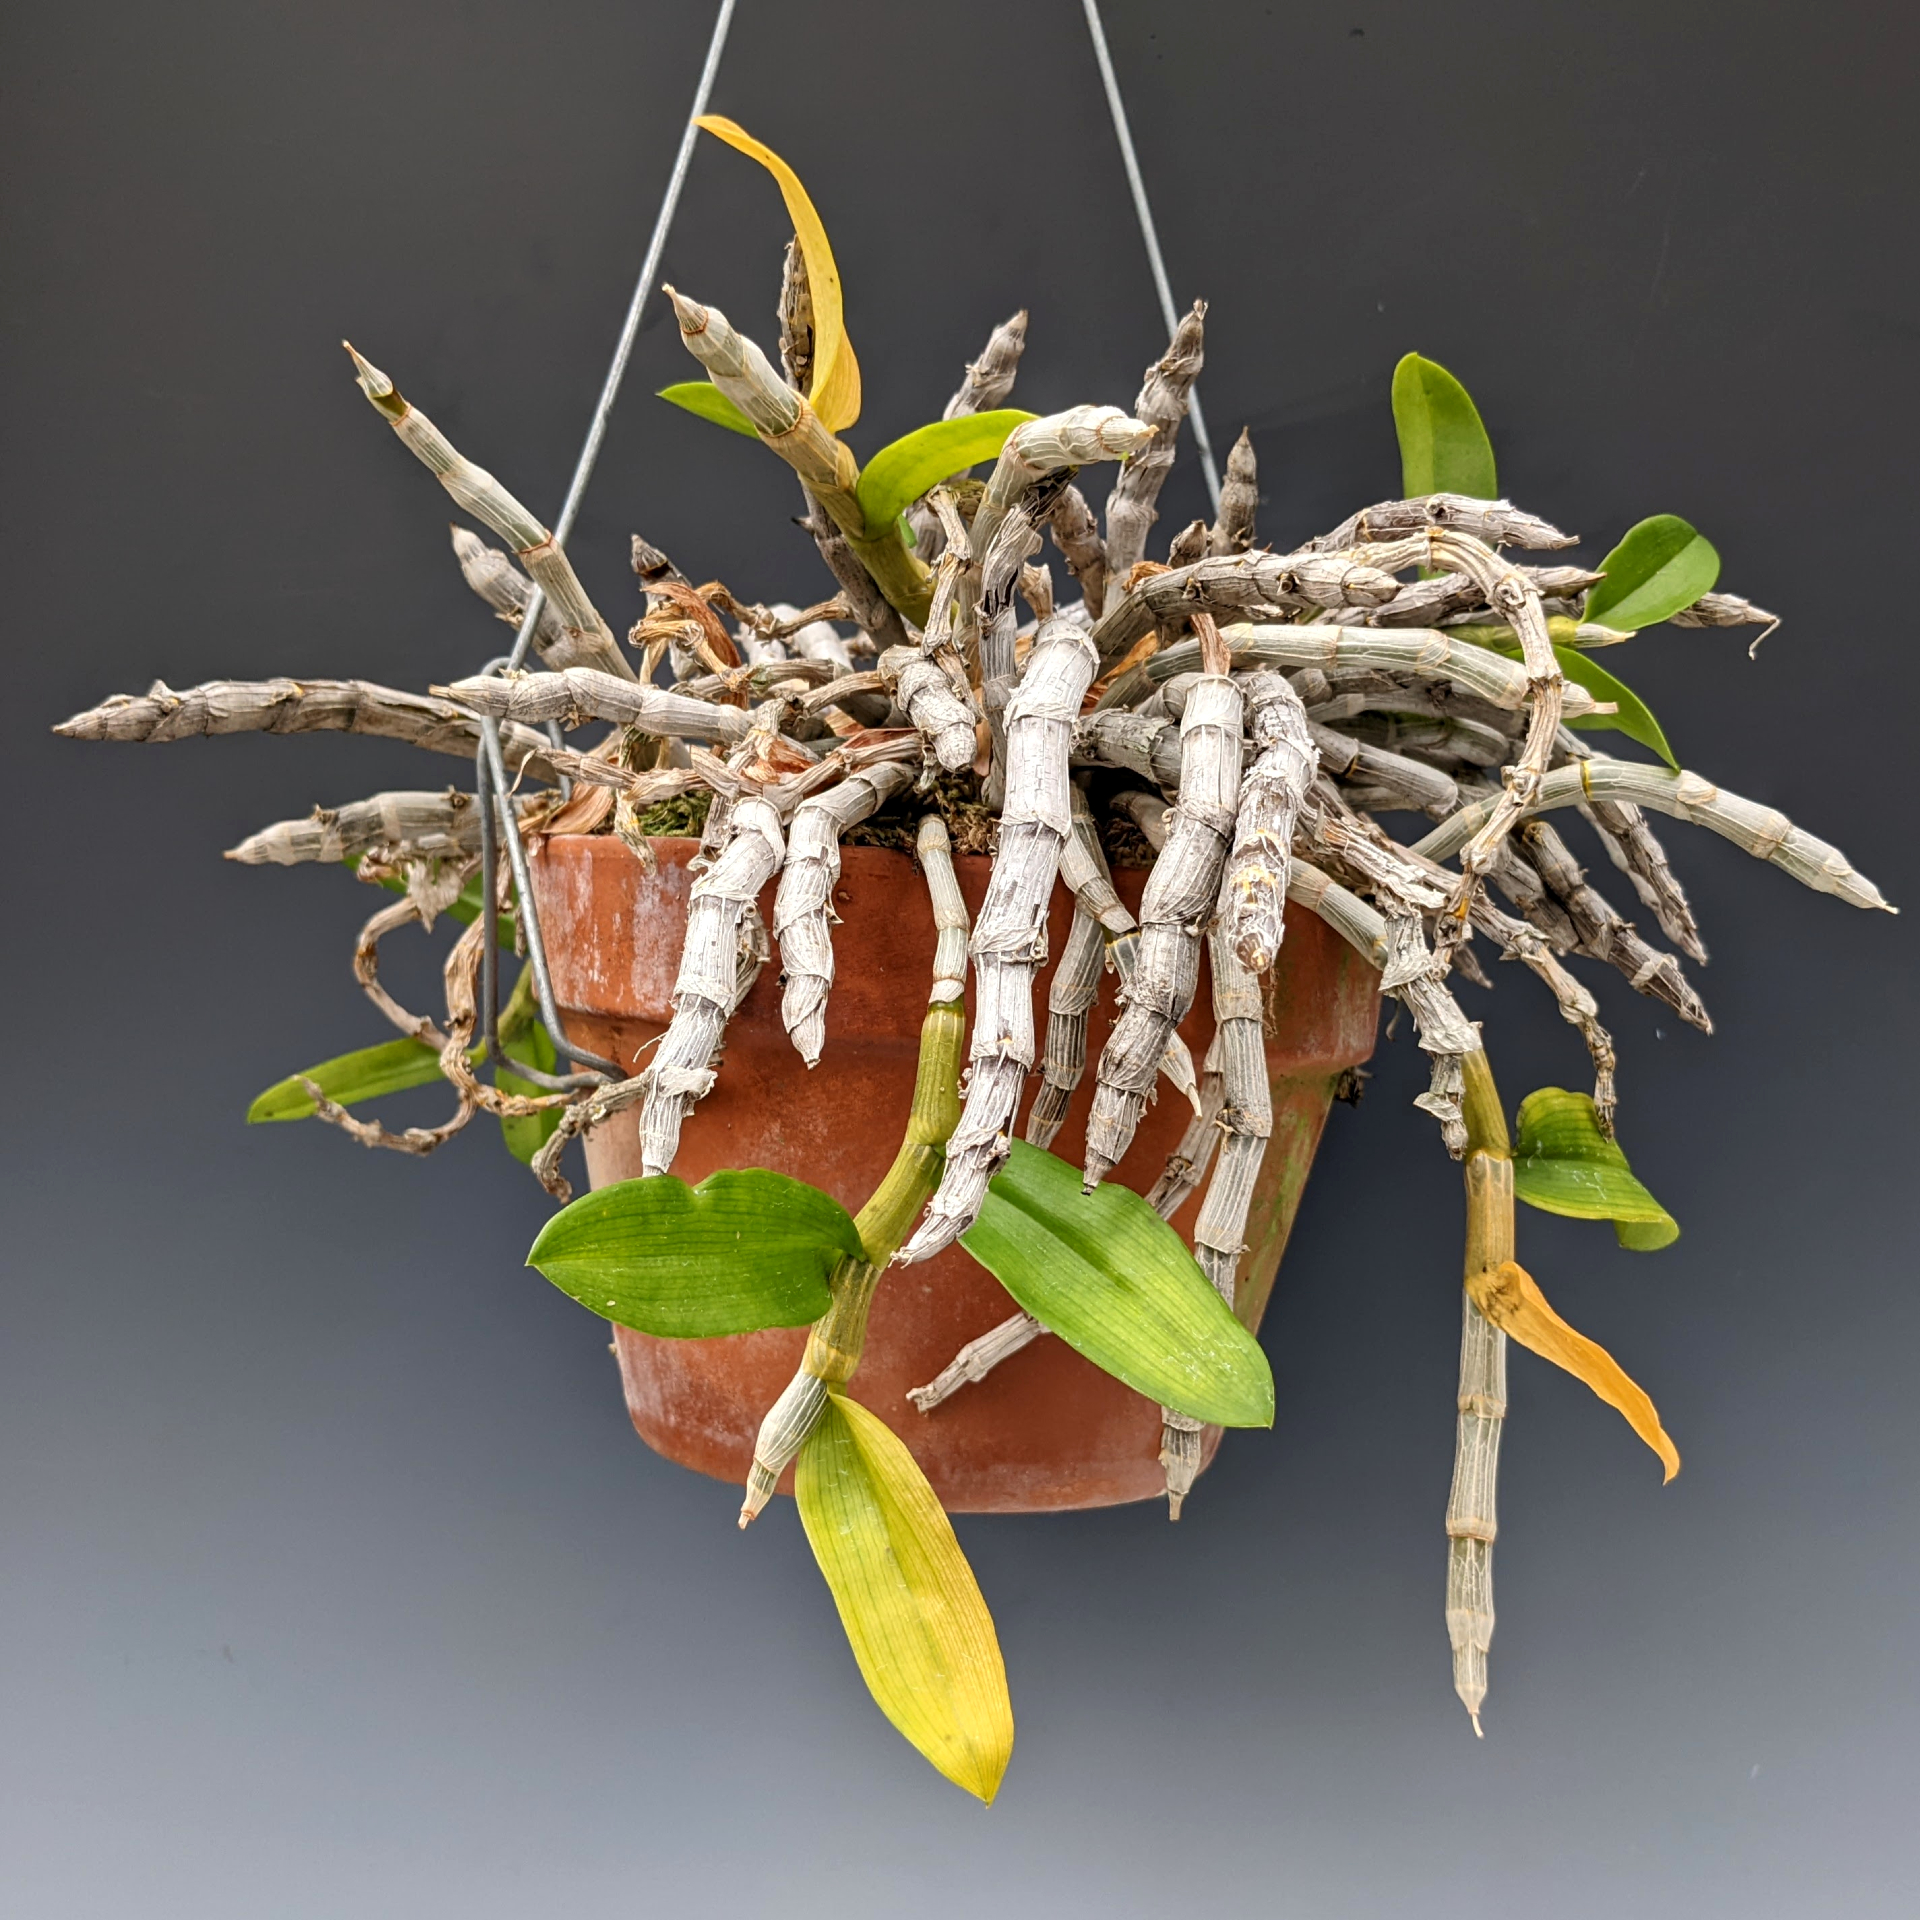 This Dendrobium parishii is showing normal leaf yellowing before its senescence (i.e. leaf drop) for the winter season. Older leafless canes are abundant on this specimen!
Natural Causes – The Best Case Scenario!
Before we dive into problem-solving details, your orchid may be developing yellow leaves as part of its natural growth habit. Orchids with thin leaves that grow atop or alongside pseudobulbs (i.e. Oncidiinae) will naturally shed their leaves after 2 to 4 new generations of pseudobulbs have been produced. For certain types of orchids, such as Dendrobium, leaf yellowing is often the first sign of the natural deciduous cycle that occurs during the cool, dry winter season. If this is the case, simply decrease watering accordingly and enjoy the wait until your orchid begins pushing new growths (and likely flowering) in spring. If neither of these examples apply, keep in mind that orchid leaves are constantly exposed to bacterial and fungal pathogens that naturally occur in their environment. The older the leaves are, the higher the likelihood of having minor damage through which these pathogens can enter the leaf. In these scenarios, the leaf is oftentimes shed to protect the rest of the plant.
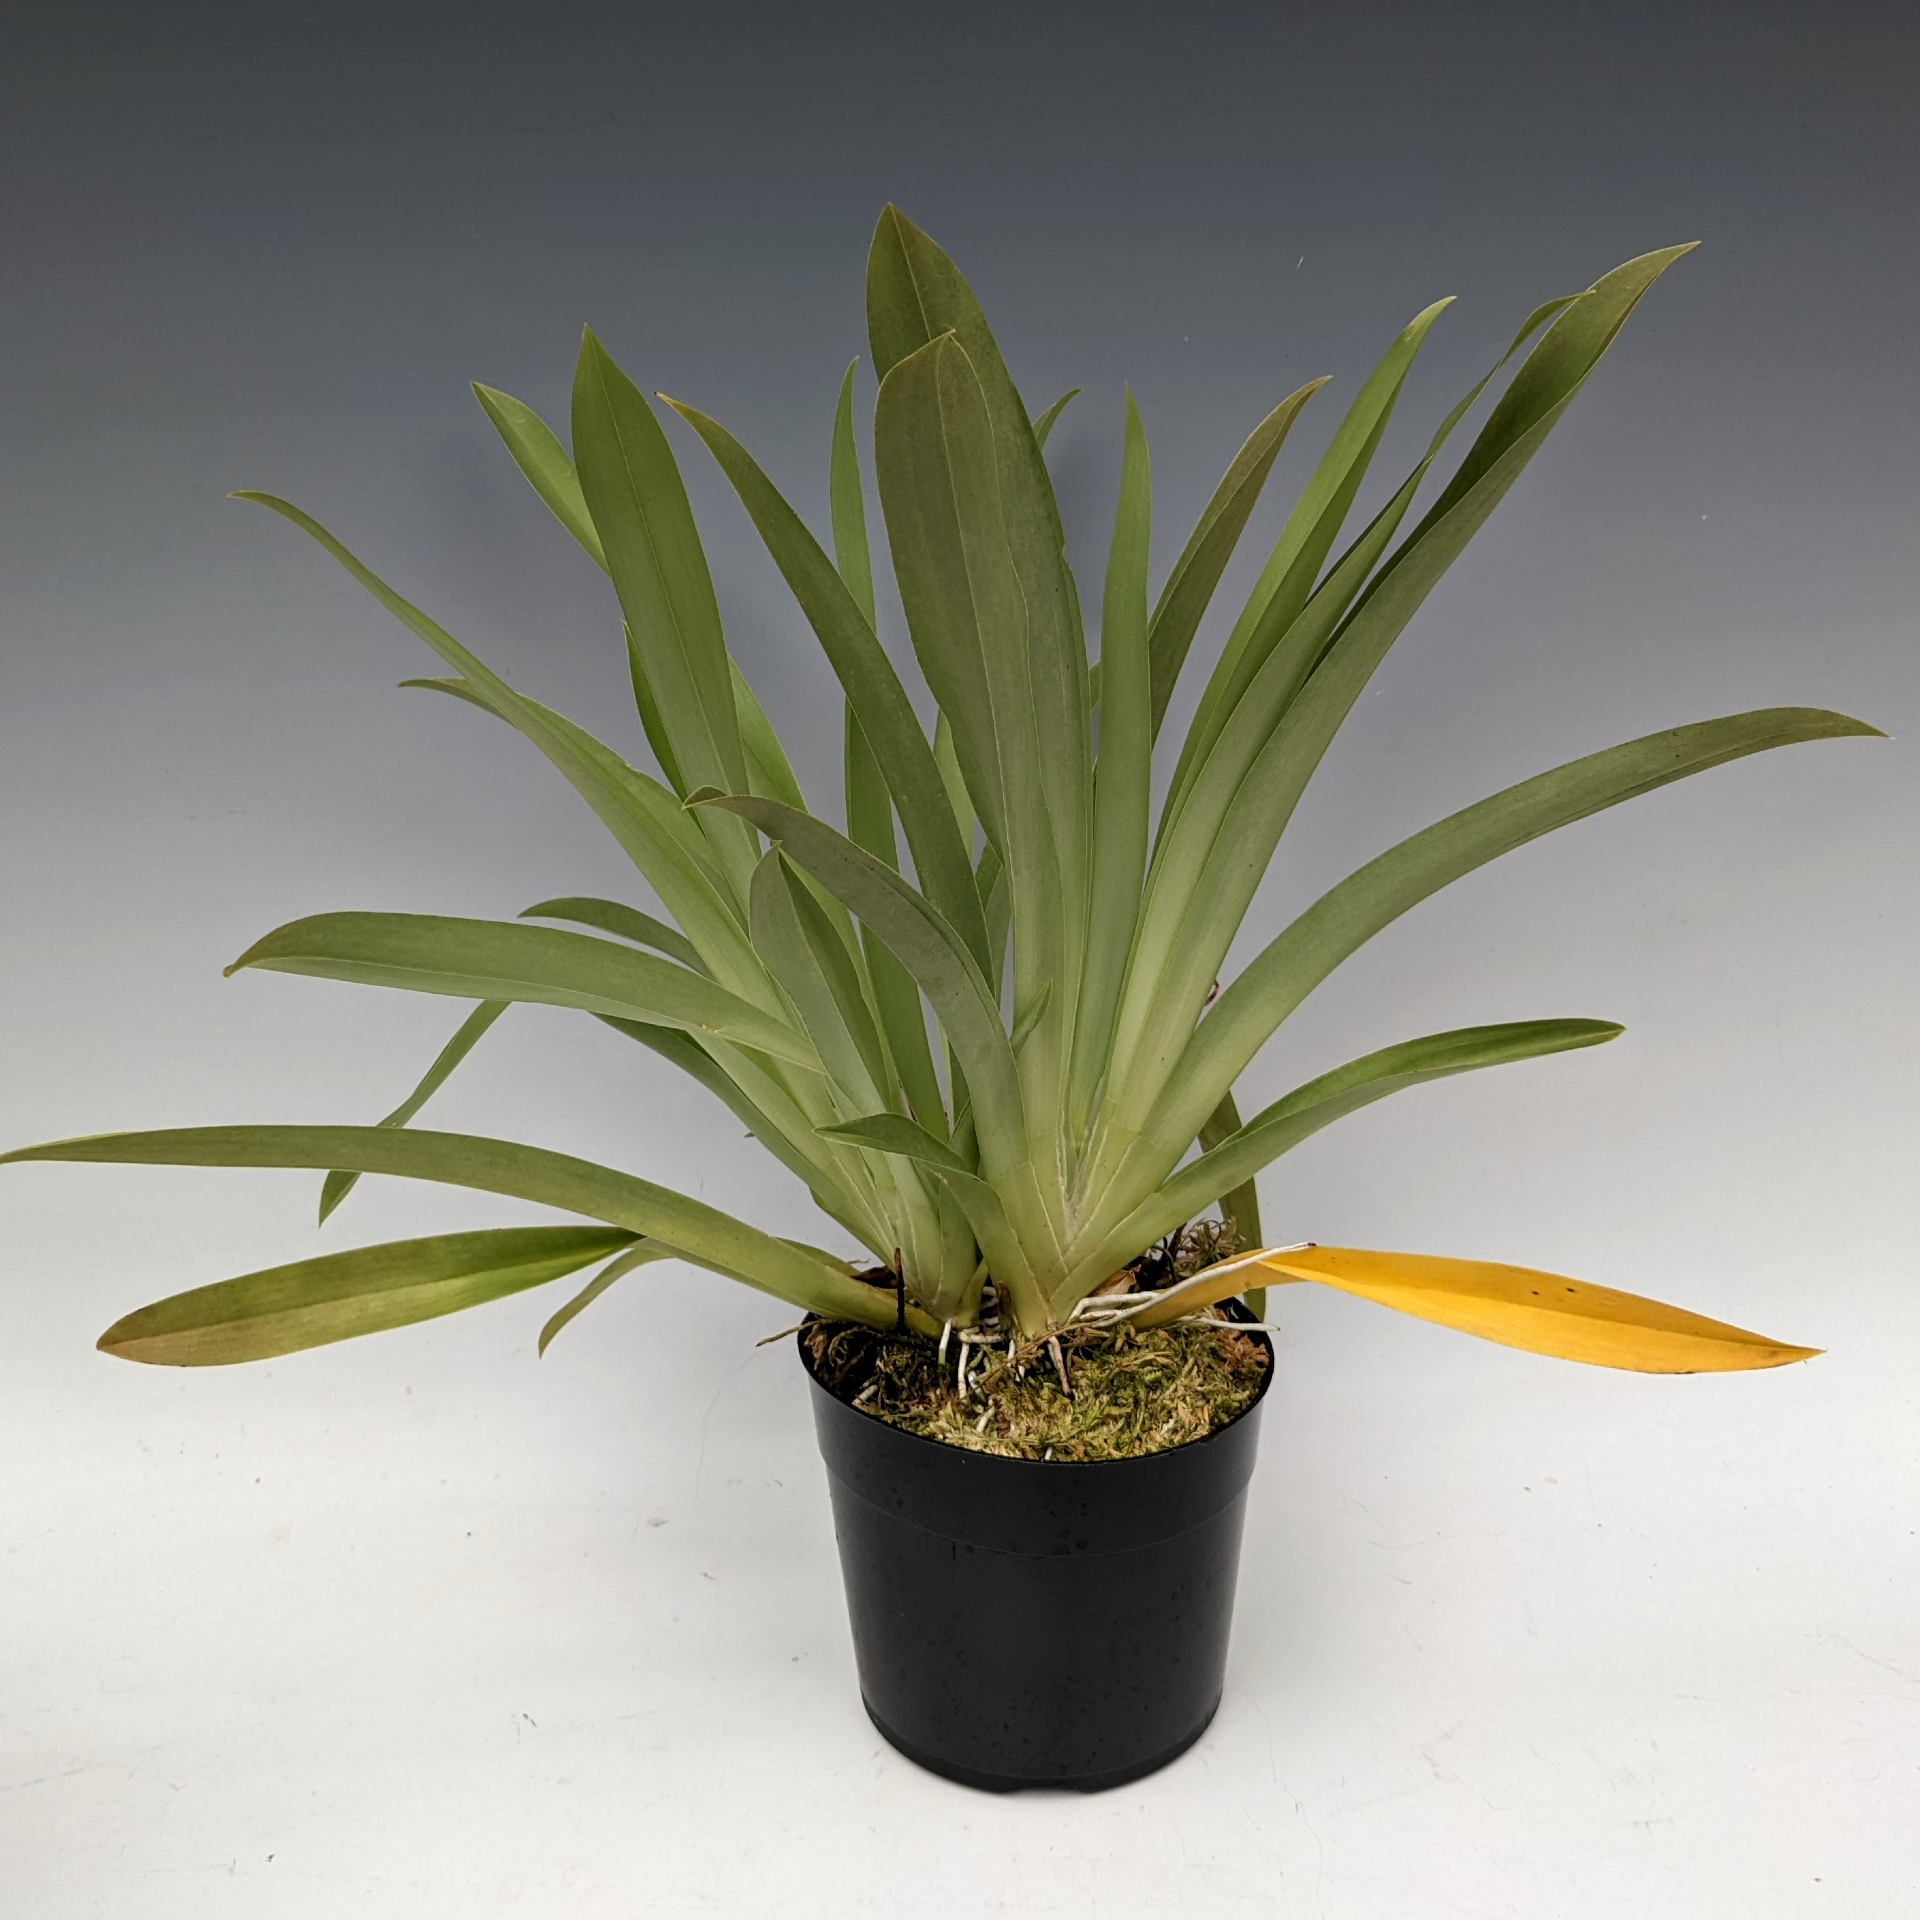 A Miltoniopsis Andrea West orchid with its oldest leaf turning yellow as it naturally prepares to senesce. This leaf is attached to the oldest pseudobulb, which is at the center of the pot. It has produced three new growths, two of which can be seen in this photo. We expect this leaf and its opposite to fully drop off by the end of this upcoming growing season.
Roots as the Root of the Problem
Orchids utilize their roots to acquire both water and nutrients. If the root system is suddenly compromised, the leaves of the plant will turn yellow as they are sacrificed for these resources. There are various possibilities as to how your orchid’s root system became damaged:
- Overwatering has led to root rot. All orchids, even the water-loving types, need to have their roots dry slightly between watering. As a rule of thumb, your orchid should be watered as the potting media approaches dryness. This is typically more challenging during the cooler winter months, where it can take up to a week or more for the media to dry between waterings. If using decorative containers, be sure that all water has drained out of your orchid’s pot before returning it to the container. If using a humidity tray or saucer for increasing humidity, be sure that the pot is elevated above the water level. Orchids that are left sitting in water will inevitably develop root rot.
- Potting media formula stays too wet. For most orchids, the potting media should be fast-draining and provide adequate aeration for the roots to breathe. New Zealand Sphagnum Moss is a premium orchid potting media option as it dries evenly throughout the pot. If opting for an Orchid Bark Mix, be sure that it consists of at least 25% charcoal or perlite to aerate the mix. For water-loving orchids (i.e. Phragmipedium & Pleurrothalidinae), this is less likely to be the cause.
- Potting media has begun to break down due to age. Orchid potting media should be replaced every 1 to 3 years, depending on its initial quality and frequency of fertilizer use. The media is ready for replacement if it is physically breaking apart or smell acidic.
- Chronic underwatering has led to root dehydration and death. On the opposite side of the watering spectrum is under-watering. In this case, an orchid has gone too long without water for several periods (or for one far too continuous period), leading to the demise of the entire root system. This can also occur if the plant is not watered thoroughly enough during regular waterings. Be sure that the orchid is "through watered," such that water runs through the drain holes. This ensures that the potting media is fully and evenly saturated.
- Recent repotting has led to transplant shock. If a recent orchid repotting required root removal or potting media replacement, your plant may experience temporary transplant shock. Root removal will have decreased your orchid’s water absorption capacity and your plant may be decreasing its leaf quantity to compensate. The introduction of fresh potting media will have introduced a large change in pH for the root system as well, which will temporarily decrease nutrient absorption ability until the roots acclimate.
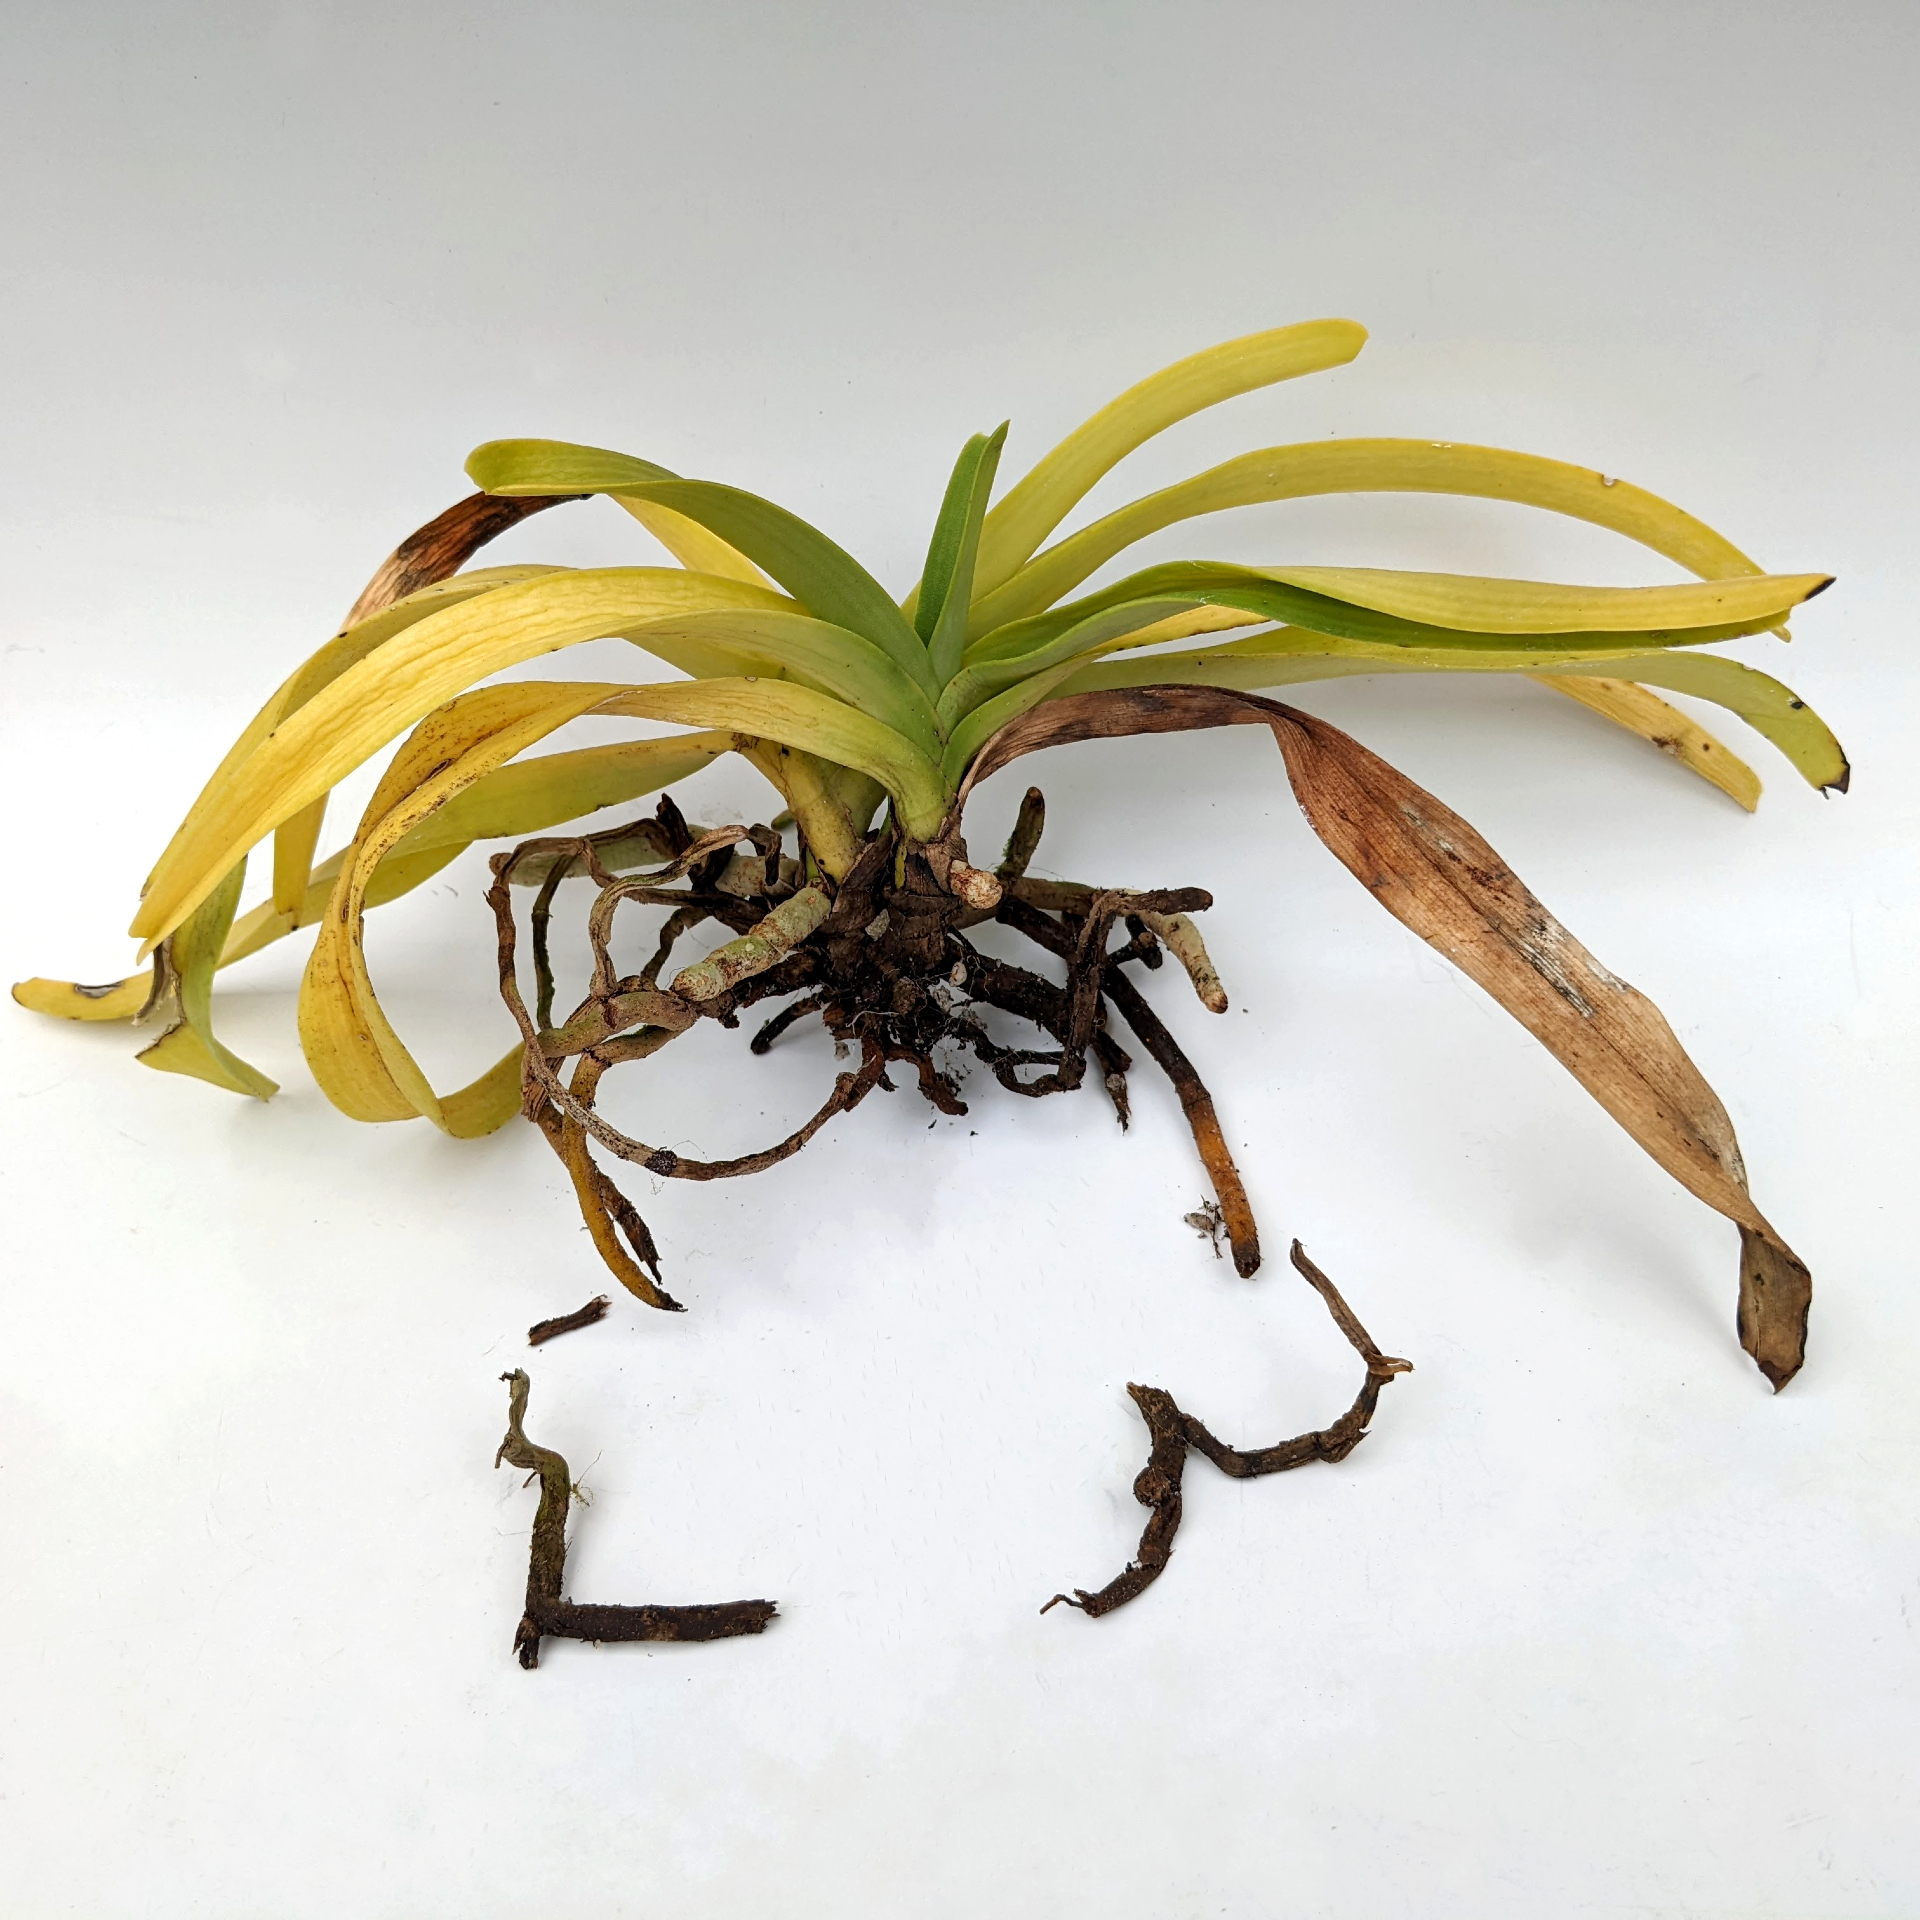 A neglected Vandachostylis hybrid that has suffered from root rot. The bark mix that this orchid was potted in was far too old and compacted. This mix had been staying wet between waterings and restricting the root's access to oxygen. As a result, the deepest roots have died off. This orchid has been fueling the growth of three new roots by sourcing nutrients and water from its leaves. The dead roots will be removed and this orchid will be potted in a fresh, aerated mix to encourage its recovery.
Environmental Causes of Yellowing Orchid Leaves
Orchids are more sensitive than your average houseplant. While the fantastic flowers and unique foliage make them worth the extra effort, it is important to note a few orchid culture taboos that may cause yellowing leaves:
- Sunlight or LED light exposure is too bright. As a rule of thumb, orchids should never be exposed to direct sunlight, which can cause sunburn on the leaves. Most orchids grow epiphytically attached to tree trunks or in the tropical forest understory, where they receive varying degrees of filtered sunlight. If your orchid prefers shaded to semi-shaded conditions (low to medium light), then bright light (i.e. south-facing window) may be the cause of leaf yellowing.
- Fertilizer application is too strong. Growing as either epiphytic or semi-terrestrial plants, orchids are adapted to growing with limited access to nutrients. As a result, using too strong (i.e. concentrated) fertilizer formula can result in fertilizer burn. We recommend our professional formula, Green Jungle™ Orchid Food. This fertilizer was developed by Jerry Fischer and a team of Ph.D.’s after analyzing the nutritional content of the environments in which orchids grow in the wild.
- Exposure to ethylene during shipping. Orchids naturally produce the hormone ethylene as a byproduct during leaf senescence. The presence of this hormone accelerates the process of leaf drop. This creates a minor issue when wrapping and packing an orchid for shipping. If the orchid has begun the process of senescing a leaf, the ethylene it is producing will become concentrated in the box during shipping. As a result, a recently shipped orchid may exhibit faster leaf yellowing on its oldest leaves than usual. This usually does not progress farther than the one or two oldest leaves in thin-leaved orchids. We include ethylene-absorbing packets to counteract this effect when shipping particularly sensitive genera, such as Phragmipedium.
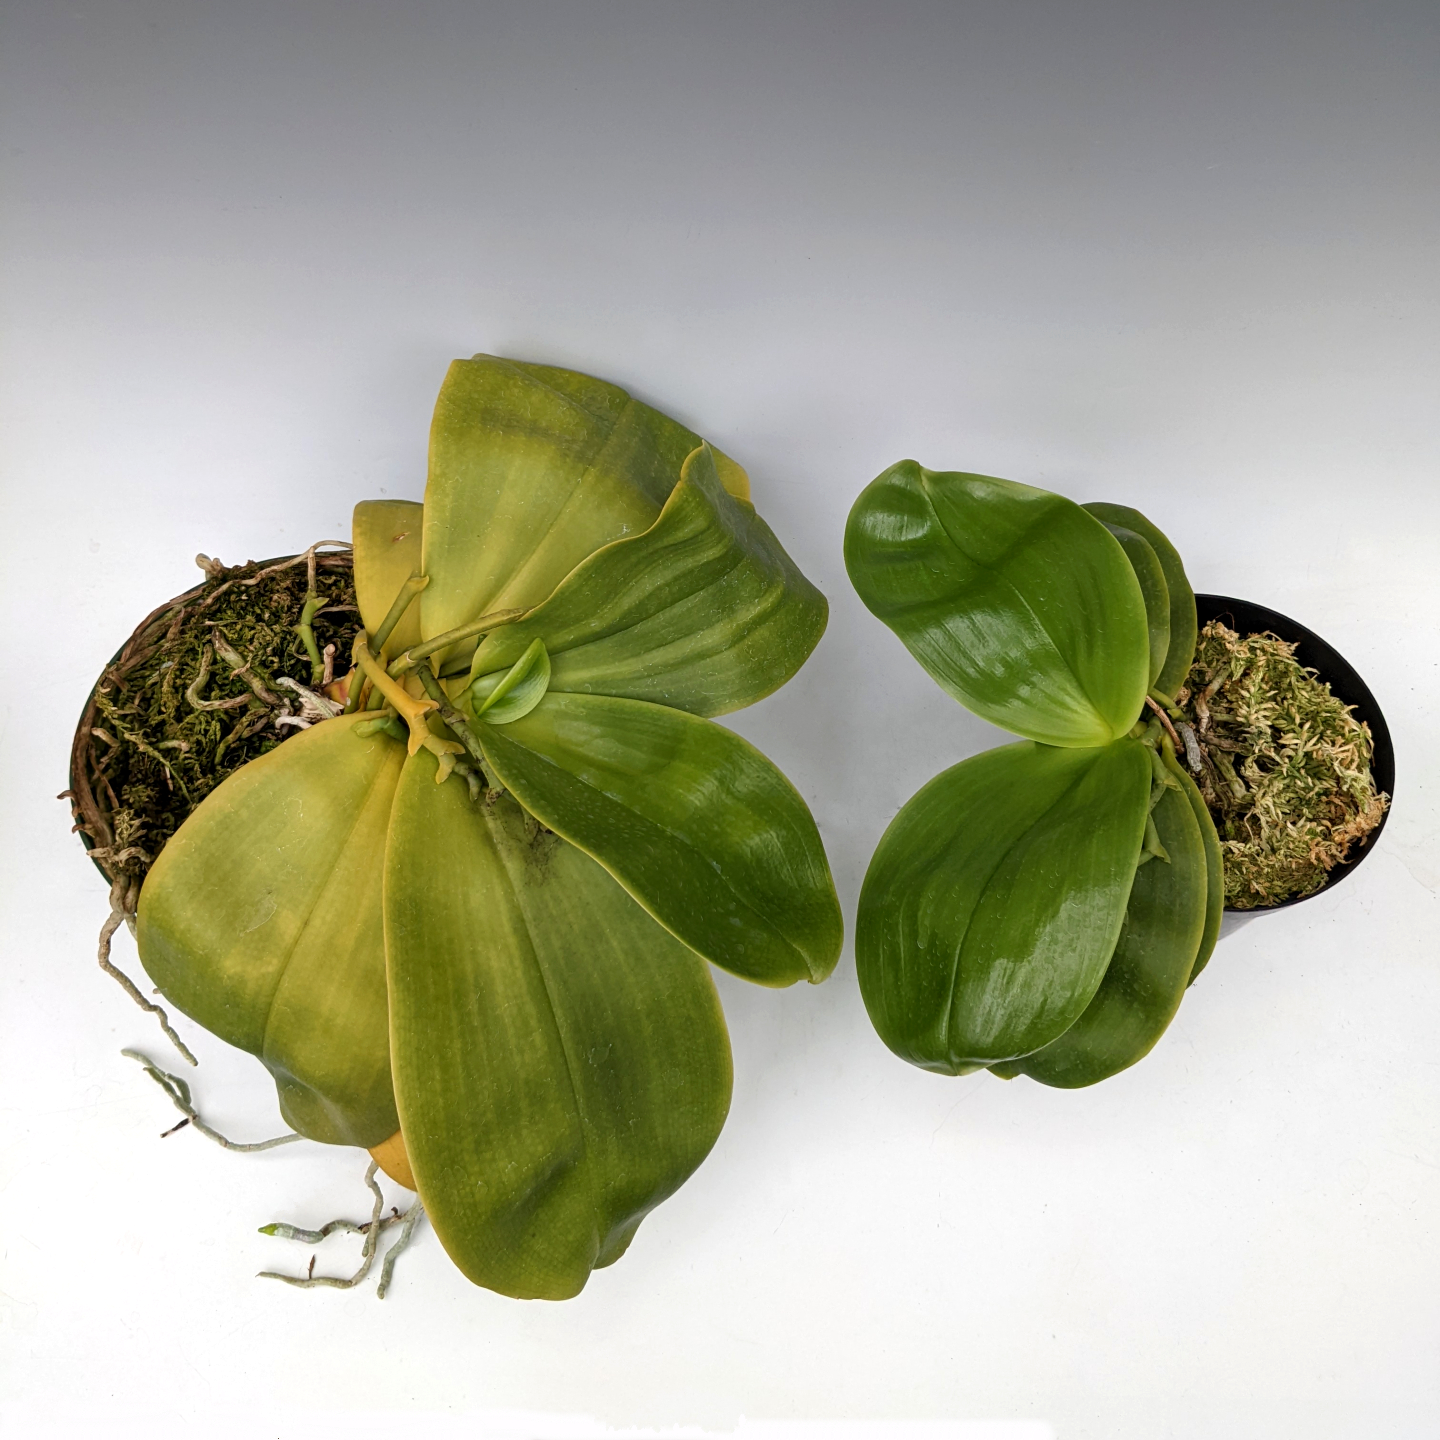
Two Phalaenopsis bellina orchids. The plant on the right has been recently repotted into fresh New Zealand sphagnum moss and has lush, dark green leaves. The specimen plant on the left is in older moss which has gone acidic. This pH of this moss inhibits nutrient uptake, leading to the yellowing of the oldest leaves on this orchid. The best solution is to carefully remove the old media, then replace it with fresh moss. After a few weeks of regular watering and liquid fertilizer applications, the leaves will take on their lush, dark green color once more.
Your Orchid May Be Nutrient Deficient
During periods of active growth, orchids require additional nutrients beyond what is available in the water. If your orchid's oldest leaves are turning yellow, yet the root system appears healthy, this is most likely an issue of nutrient deficiency. We hear about this scenario most often during the spring season, when new growth has resumed without being noticed by the grower. Check the plant for any signs of emerging bright green new growth. These are signs that your orchid may need a nutritional boost! As always, we recommend our professional formula, Green Jungle™ Orchid Food.
Allow the Yellow Leaf to Remain on the Plant
Your orchid’s best use of its leaves is for conducting photosynthesis, the mechanism by which it produces sugars that fuel its growth and eventual flowering. If the plant has been forced to source nutrients and/or water from its leaf, it has been out of necessity. Removing this leaf without first investigating the plant’s condition may lead the next leaf to turn yellow in a similar fashion. Instead of removing the yellow leaf, allow it to fall off once the orchid has fully used up its resources. Dried, brown leaves can be removed since they no longer provide any benefit to the plant.
Keep in mind that this advice is strictly for plants with only yellowing throughout the leaf. If there are additional symptoms such as brown spotting, this may be caused by a leaf fungal or bacterial pathogen. In this case, it is best to remove the leaf to prevent the spread of the pathogen throughout the orchid or to other nearby plants.
What to Do if Your Orchid Roots Are Rotting
Using sterile shears, cut away any rotted roots. Healthy orchid roots have a green to white color to them. If the roots have begun to decay, they will be dark with a mushy texture. In this case, they should be removed to prevent the spread of rot. Cut the roots back to the nearest healthy root tissue. Your orchid will grow back new, healthy roots in due time. Next, pot the plant using fresh Orchid Potting Media. The old potting medium may have gone acidic and is likely hosting pathogens that would continue to harm the root system if reused. For semi-terrestrial orchids (such as Paphiopedilum and Phragmipedium), allow for a 2-day dry rest before watering. For most other epiphytic orchids, allow for a 5 to 7-day dry rest before watering, depending on the season.
I hope this article helps bring clarity to you hobbyists out there experiencing the challenge of yellowing orchid leaves. Keep in mind that this is a natural part of orchid culture and overcoming obstacles is an integral part of being a true orchid hobbyist. Most of all, be sure never stop learning and keep having fun with it!